



Resistance loop bands—often called mini bands—provide a compact way to add elastic resistance to lower-body, upper-body, and stabilization exercises. Because the loop is already closed, it can be positioned around the thighs, ankles, feet, wrists, or forearms without tying a knot or attaching handles.
This guide explains how to perform ten useful resistance loop exercises, where to position the band, how to choose an appropriate resistance, and how to combine the movements into a simple beginner workout.
For the exercises below, consider our 12-inch exercise band loops. Each package contains ten matching loops in one selected resistance level, making them practical for physical therapy clinics, athletic training rooms, group programs, and individual home exercise plans.
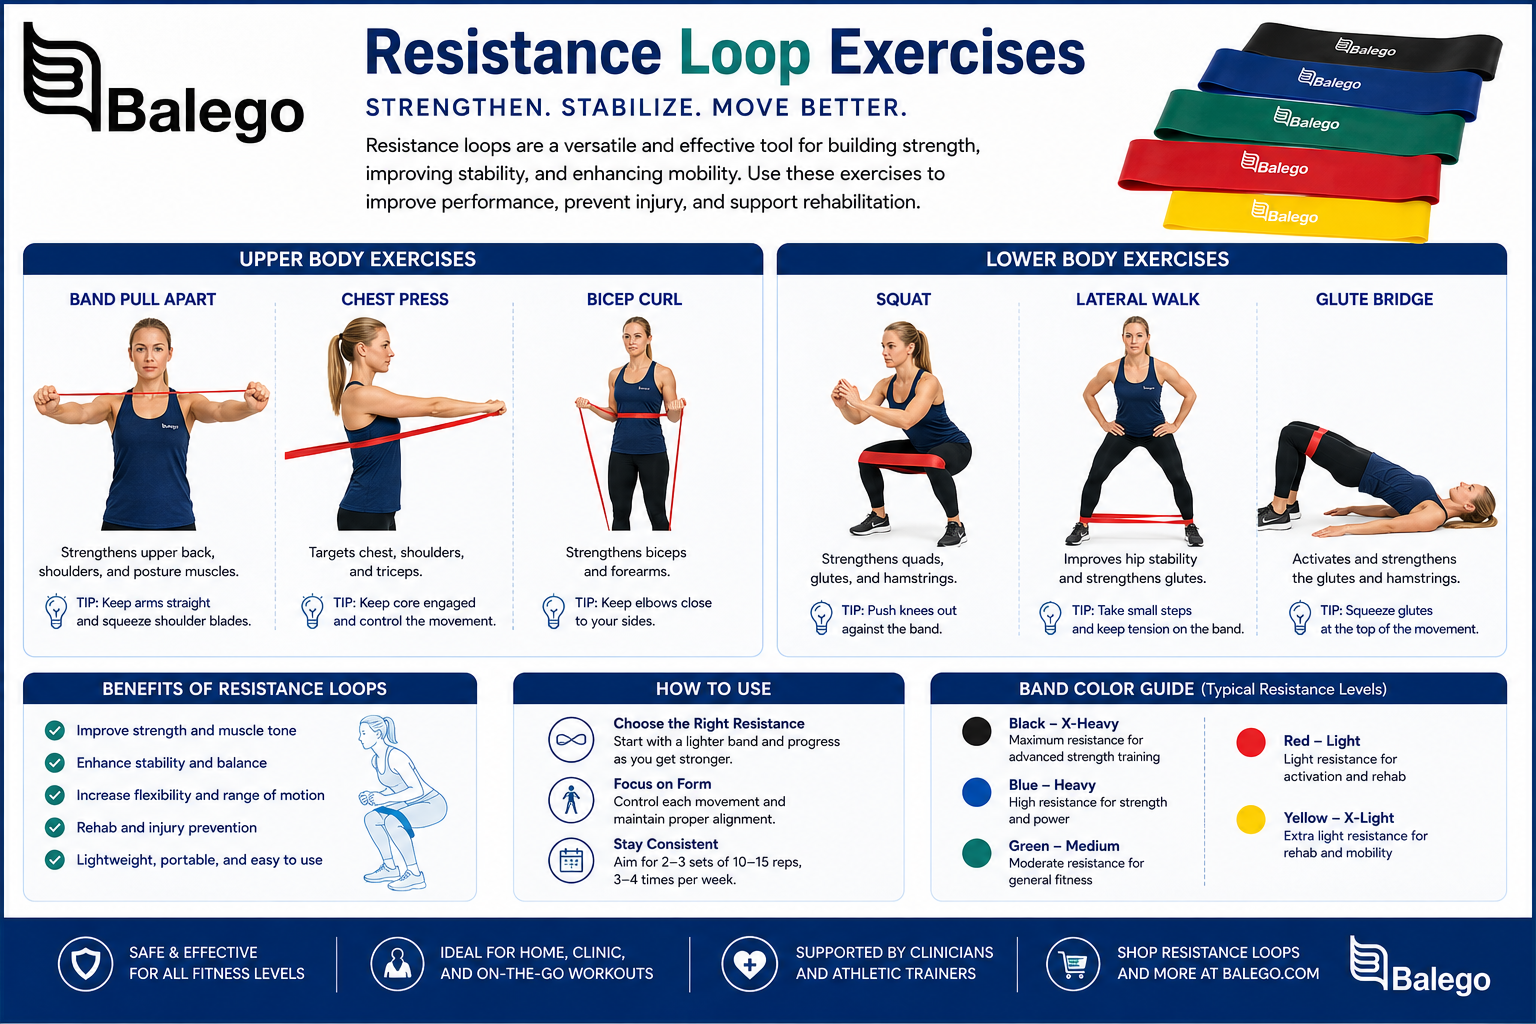
Important: Exercise should not cause sharp pain, joint pain, numbness, dizziness or a sudden increase in symptoms. Stop if these occur. People recovering from an injury, surgery or medical condition should follow the program provided by their physician or rehabilitation professional.
Quick Resistance Loop Exercise Chart
| Exercise | Primary area | Recommended band position | Starting volume |
|---|---|---|---|
| Lateral band walk | Outer hips and glutes | Above knees | 8–12 steps each direction |
| Monster walk | Glutes and hip stabilizers | Above knees or at ankles | 8–12 steps forward and backward |
| Clamshell | Outer hip | Above knees | 8–15 each side |
| Banded glute bridge | Glutes and posterior chain | Above knees | 8–15 repetitions |
| Banded squat | Thighs, hips and glutes | Above knees | 8–15 repetitions |
| Standing hip abduction | Outer hip and standing-leg control | Above knees or at ankles | 8–12 each side |
| Seated hip abduction | Outer hips | Above knees | 10–20 repetitions |
| Band pull-apart | Upper back and rear shoulders | Around wrists or hands | 8–15 repetitions |
| Shoulder external rotation | Rotator cuff and shoulder control | Around wrists | 8–15 repetitions |
| Banded wall slide | Shoulders and shoulder-blade control | Around wrists | 6–12 repetitions |
These are general starting ranges rather than a prescribed rehabilitation protocol. Begin with fewer repetitions when learning a movement and increase only while maintaining smooth, controlled form.
How to Choose the Right Resistance Loop
The correct resistance is challenging enough to create steady tension but light enough that you can complete the movement without compensating.
A suitable band should allow you to
- Maintain the intended body position.
- Move through a comfortable range of motion.
- Control both the outward and return phases.
- Keep the band from pulling your knees, arms, or shoulders out of position.
- Finish the set with effort but without losing technique.
Our exercise loops are offered in the following progression:
| Balego resistance level | Color | General starting use |
|---|---|---|
| X-Light | Red | Gentle activation, cautious beginners and clinician-directed rehabilitation |
| Light | Orange | Learning new movements and higher-repetition exercises |
| Medium | Yellow | General home exercise and intermediate strengthening |
| Heavy | Green | Experienced users requiring greater resistance |
| X-Heavy | Blue | Advanced users who can maintain control against substantial tension |
Band colors are not standardized across every manufacturer. Select resistance according to movement quality and the product’s stated level rather than assuming that the same color always represents the same resistance.
Signs that the band is too strong
Choose a lighter loop when:
- Your knees collapse inward during squats or bridges.
- You cannot keep your pelvis level during standing exercises.
- Your shoulders shrug during upper-body movements.
- You have to swing, twist, or use momentum.
- The band sharply snaps back during the return phase.
- Your exercise range becomes much smaller than it is without resistance.
A lighter band used with proper form is generally more productive than a stronger band that changes the movement.
Where Should a Resistance Loop Be Placed?
Band position can meaningfully change the difficulty of an exercise.
| Placement | Relative difficulty | Common uses |
|---|---|---|
| Above the knees | Easier | Squats, bridges, clamshells and beginner lateral walks |
| Around the lower legs | Moderate | Lateral walks, standing hip exercises and monster walks |
| Around the ankles | More difficult | Advanced lateral walks and standing hip exercises |
| Around the forefeet | More difficult | Selected hip and ankle-control exercises |
| Around the wrists | Light to moderate | Shoulder rotation, wall slides and upper-body activation |
| Around the hands | Depends on grip and band length | Pull-aparts and controlled shoulder exercises |
Do not position the band directly across the kneecaps, elbows, or another sensitive joint. It should rest on muscular tissue above or below the joint.
For most beginners performing lower-body exercises, placing the loop several inches above the knees provides the easiest starting position. Moving the band toward the ankles increases the lever arm and usually makes the same exercise more demanding.
Ten Resistance Loop Exercises
1. Lateral Band Walk
The lateral band walk trains the muscles that move and stabilize the hip while the body travels sideways.
Band placement: Begin with the loop above the knees. More experienced users may position it around the lower legs or ankles.
Instructions:
- Stand with your feet approximately hip-width apart.
- Bend your knees slightly and move your hips backward into a shallow athletic stance.
- Create gentle outward pressure against the band before taking the first step.
- Step sideways with the leading foot while keeping both feet pointed forward.
- Follow with the trailing foot, returning to approximately hip-width without allowing the band to become slack.
- Complete the planned steps in one direction and then return in the opposite direction.
Form cue: Keep your hips level and imagine pushing the floor apart with your feet.
Common error: Letting the trailing foot snap inward. Bring it in slowly enough that tension remains on the loop.
2. Monster Walk
Monster walks use diagonal steps to challenge the hips through a slightly different movement pattern than a traditional lateral walk.
Band placement: Above the knees for beginners or around the ankles for greater difficulty.
Instructions:
- Begin in a shallow squat with your feet slightly wider than hip-width.
- Maintain outward pressure against the loop.
- Step forward and diagonally outward with one foot.
- Follow with the opposite foot, again moving forward and outward.
- Continue alternating for the planned distance.
- Reverse the pattern by stepping backward and diagonally outward.
Form cue: Keep your feet separated rather than walking on a narrow line.
Common error: Standing upright between steps. Maintain the same hip and knee position throughout the set.
3. Clamshell
The clamshell isolates the outer hip while limiting movement through the lower back.
Band placement: Around the thighs just above the knees.
Instructions:
- Lie on one side with your hips stacked and your knees comfortably bent.
- Keep your feet together.
- Brace your trunk gently so that your pelvis does not roll backward.
- Lift the top knee against the loop while keeping both feet in contact.
- Pause briefly at the top of the comfortable range.
- Lower the knee slowly and repeat before changing sides.
Form cue: Think of the thigh rotating in the hip socket while the pelvis remains still.
Common error: Rolling the entire body backward to create a larger movement. A smaller motion with a stable pelvis is preferable.
4. Banded Glute Bridge
Adding a loop to a bridge encourages outward hip tension while the hips extend.
Band placement: Around the thighs above the knees.
Instructions:
- Lie on your back with your knees bent and feet flat on the floor.
- Position your feet approximately hip-width apart.
- Press your knees gently outward until the loop is tensioned.
- Tighten your abdominal muscles without holding your breath.
- Press through your feet and raise your hips.
- Stop when your shoulders, hips, and knees form a comfortable line.
- Pause briefly, then lower with control.
Form cue: Maintain the same distance between your knees from the beginning to the end of each repetition.
Common error: Arching the lower back to lift higher. End the movement when the hips are extended without excessive spinal motion.
5. Banded Squat
A loop above the knees provides an external cue to maintain outward hip tension during a squat.
Band placement: Around the thighs above the knees.
Instructions:
- Stand with your feet approximately shoulder-width apart.
- Create mild outward pressure against the loop.
- Move your hips backward and bend your knees as though sitting toward a chair.
- Keep your feet firmly in contact with the floor.
- Descend only as far as you can maintain balance and control.
- Press through your feet and return to standing.
Form cue: Keep the knees traveling in the same general direction as the toes.
Common error: Forcing the knees excessively outward. The goal is controlled alignment, not the widest possible knee position.
6. Standing Hip Abduction
Standing hip abduction strengthens the outer hip of the moving leg while also challenging the stability of the leg supporting your weight.
Band placement: Above the knees for an easier variation or around the ankles for a harder variation.
Instructions:
- Stand next to a stable counter or chair if balance assistance is needed.
- Shift your weight onto one leg without leaning your trunk.
- Move the opposite leg slowly out to the side.
- Keep the toes pointing generally forward.
- Pause briefly, then return without letting the loop pull the leg inward.
- Complete the repetitions before changing sides.
Form cue: Grow tall through the standing side rather than leaning away from the moving leg.
Common error: Turning the toes upward or rotating the hip outward to create a larger range.
7. Seated Hip Abduction
The seated variation is useful when standing balance is limited or when a simple hip-activation movement is desired.
Band placement: Around the thighs above the knees.
Instructions:
- Sit near the front of a stable chair with both feet flat on the floor.
- Keep your chest upright and your pelvis level.
- Press both knees outward against the loop.
- Pause without lifting the feet.
- Slowly return to the starting position while keeping some tension on the band.
Form cue: Move both knees evenly.
Common error: Rocking the trunk backward to overcome excessive resistance.
8. Resistance Loop Pull-Apart
A short loop can be used for a compact pull-apart that emphasizes the upper back and rear shoulders.
Band placement: Around the wrists or held across the hands.
Instructions:
- Stand or sit upright with your arms extended in front of you.
- Begin with gentle tension on the loop.
- Keep your ribs stacked over your pelvis rather than arching your back.
- Separate your hands by moving the arms outward.
- Pause when you feel the shoulder blades move toward one another.
- Return slowly without allowing the band to snap your hands together.
Form cue: Keep the shoulders away from the ears.
Common error: Using a band so strong that the elbows bend or the shoulders shrug.
9. Shoulder External Rotation
This exercise challenges the muscles that rotate and stabilize the shoulder.
Band placement: Around the wrists.
Instructions:
- Stand or sit with your elbows bent approximately 90 degrees.
- Keep the elbows close to your sides.
- Begin with the forearms pointing forward and slight tension on the loop.
- Move both hands outward while keeping the elbows stationary.
- Stop before the shoulders roll forward or the elbows separate from the body.
- Return slowly to the starting position.
Form cue: Imagine the forearms opening like two gates while the elbows remain anchored.
Common error: Moving through the wrists instead of rotating from the shoulders. Keep the wrists neutral.
People completing this movement for shoulder rehabilitation should use the resistance, range, and technique recommended by their clinician.
10. Banded Wall Slide
The wall slide combines upward arm movement with outward pressure against a resistance loop.
Band placement: Around the wrists.
Instructions:
- Stand facing a wall with your forearms resting against it.
- Position the elbows below shoulder height and create light outward tension on the loop.
- Keep your neck relaxed and your ribs from flaring forward.
- Slide both forearms upward along the wall.
- Maintain outward pressure as the arms rise.
- Stop at a comfortable height and return slowly.
Form cue: Reach upward while gently spreading the wall apart.
Common error: Arching the lower back to move the arms higher.
Beginner Resistance Loop Workout
The following routine combines lower- and upper-body exercises without requiring an anchor point.
| Order | Exercise | Repetitions |
|---|---|---|
| 1 | Banded squat | 8–12 |
| 2 | Lateral band walk | 8–10 steps each direction |
| 3 | Banded glute bridge | 10–15 |
| 4 | Seated or standing hip abduction | 8–12 each side |
| 5 | Shoulder external rotation | 8–12 |
| 6 | Banded wall slide | 6–10 |
Complete one round while learning the exercises. Progress to two or three rounds as tolerated, resting long enough to restore good technique.
For a general strengthening program, two or three nonconsecutive sessions per week may be a practical starting schedule. Rehabilitation frequency should instead follow the instructions provided by the treating professional.
How to Make a Loop-Band Workout Easier or Harder
Resistance level is only one way to adjust an exercise.
| To make it easier | To make it harder |
|---|---|
| Choose a lighter loop | Choose a heavier loop |
| Place a leg loop above the knees | Move the loop toward the ankles or feet |
| Reduce the range of motion | Increase the range while preserving form |
| Perform fewer repetitions | Add repetitions gradually |
| Use a chair, wall or counter for balance | Reduce hand support when safe |
| Move at a comfortable tempo | Add a slow three-second return phase |
| Complete one set | Add a second or third set |
| Use bilateral movements | Progress to appropriate single-leg variations |
Change one variable at a time. This makes it easier to identify whether the new challenge is appropriate.
A good progression test is simple: when you can complete every repetition with consistent alignment, controlled breathing, and a slow return phase, consider adding repetitions or moving to the next resistance level.
Common Resistance Loop Mistakes
| Problem | Likely cause | Adjustment |
|---|---|---|
| The band repeatedly rolls or folds | The band is twisted, placed over loose clothing or pulled unevenly | Flatten the loop before starting and reposition it on a smooth area |
| Knees collapse inward | Resistance is too strong or hip tension is lost | Move the band above the knees or choose a lighter level |
| The band becomes slack | Feet or hands are moving too close together | Reduce the return distance and maintain light starting tension |
| Movement feels jerky | The return phase is uncontrolled | Slow down and resist the band in both directions |
| Exercise is felt in the lower back | The trunk or pelvis is compensating | Reduce the range and brace the trunk gently |
| Shoulders move toward the ears | Upper-body resistance is excessive | Use a lighter band and shorten the range |
| One side does most of the work | Weight is shifting or the band is uneven | Recenter the loop and use a mirror or stable support |
| The band pinches the skin | Placement or clothing is allowing the material to bunch | Reposition the loop or wear fitted exercise clothing underneath |
Resistance Loop Versus Other Resistance-Band Formats
A mini loop is especially convenient for hip, glute, leg, and shoulder-control exercises, but it is not the best format for every movement.
| Equipment | Best suited for | Key distinction |
|---|---|---|
| Exercise band loops | Lateral walks, clamshells, bridges, squats and shoulder-control drills | Compact, flat, closed loop with no handles |
| Exercise ring with foam handles | Hip and leg exercises when a padded contact area is preferred | Closed tubing ring with integrated foam handles |
| Figure 8 resistance tubing | Pull-aparts, presses, curls and compact travel routines | Figure 8 shape creates two built-in gripping areas |
| Resistance tubing with handles | Rows, chest presses, curls and anchored exercises | Longer tubing with rotating handles |
| Flat resistance bands | Custom lengths, stretching, limb wrapping and clinic handouts | Open-ended flat band that can be cut or tied |
For a more detailed equipment discussion, read Resistance Tubing vs. Flat Bands: How to Choose the Right Elastic Resistance Tool.
Exercises that require a fixed high, middle, or low anchor are generally better performed with longer-handled tubing. Review our door attachment setup guide before attempting an anchored resistance-band exercise.
Resistance Loop Safety and Inspection
Inspect the loop before every exercise session.
Do not use a band that has:
- Cuts, cracks, punctures, or thinning areas.
- A sticky, brittle, or dried-out surface.
- Uneven stretching or permanent deformation.
- Damage caused by jewelry, sharp fingernails, or abrasive surfaces.
- Discoloration accompanied by a change in texture.
- A section that appears likely to split under tension.
Keep the band away from sharp edges and rough flooring. Remove rings, watches, or other items that could cut the material. Do not stretch the band toward the face, and do not release it while it is under significant tension.
Balego’s exercise band loops contain natural rubber latex. Anyone with a known latex allergy should select a suitable latex-free exercise product instead.
Care and Storage
After use:
- Wipe the band according to the product-care instructions.
- Allow it to dry fully before storage.
- Store it flat or loosely coiled.
- Keep it away from direct sunlight and excessive heat.
- Avoid oils, lotions, harsh solvents, and abrasive cleaning products.
- Do not leave it stretched around furniture or exercise equipment.
Clinics should follow their established infection-control procedures and avoid sharing a loop when the product cannot be cleaned appropriately for the intended setting.
Frequently Asked Questions
What are resistance loop bands used for?
Resistance loops are commonly used for hip and glute activation, leg strengthening, lateral movement drills, shoulder-control exercises, athletic warm-ups, and clinician-directed home exercise programs. Their closed shape makes them particularly convenient for exercises that require outward tension between the knees, ankles, hands, or wrists.
What resistance loop should a beginner use?
Most beginners should start with an X-Light or Light band. The correct level allows the user to complete the exercise without losing balance, shortening the movement excessively, or allowing the band to pull the limbs out of position.
Should a loop band go above or below the knees?
For squats, bridges, clamshells, and beginner lateral walks, the band is commonly placed above the knees. Positioning it around the lower legs or ankles usually makes an exercise more difficult. Avoid placing the loop directly across the kneecaps.
How many resistance loop repetitions should I perform?
A practical starting range is approximately 8–15 controlled repetitions or 8–12 steps in each direction. Begin with one set when learning the movement. The correct amount depends on the exercise, resistance level, training goal, and any instructions supplied by a healthcare professional.
Can resistance loops be used for upper-body exercises?
Yes. A short loop can be used for pull-aparts, external shoulder rotation, wall slides, and other controlled shoulder exercises. Longer tubing or flat bands are generally more suitable for large rows, chest presses, curls, and exercises requiring a distant anchor point.
Why does my resistance band roll up?
Rolling can occur when the band is twisted, positioned over loose fabric, stretched unevenly, or too strong for the exercise. Flatten the loop before beginning, place it on a smooth area of clothing or skin, and consider a lighter resistance.
Can resistance loop bands be used every day?
Light activation exercises may be used frequently in some programs, but harder strengthening sessions require appropriate recovery. Frequency should reflect the muscles trained, workout intensity, and personal recovery. Follow clinician instructions when using a loop for rehabilitation.
When should a resistance loop be replaced?
Replace it when you notice cracking, thinning, cuts, punctures, permanent stretching, tackiness, brittleness, or an uneven response to tension. Do not wait for a visibly damaged band to break during exercise.
Shop Resistance Bands and Exercise Tools
Shop resistance loops, tubing, flat bands, and exercise rings, or explore our complete Resistance Band and Tubing Exercise Guide library for additional equipment comparisons, setup instructions, and exercise resources.


