



EMPI Select Quick Start Guide: Setup, Controls, Electrode Contact and Troubleshooting
The EMPI® Select™ is a dual-channel TENS unit with body-area Quick Select buttons, manually selectable stimulation programs, separate intensity controls for each channel, an adjustable treatment timer, and stored usage information.
This guide focuses on the practical questions that arise when someone is preparing the unit for a treatment session:
- Which part connects first?
- Why does the intensity begin at zero?
- How do you unlock the controls?
- What does the flashing electrode icon mean?
- Why can stimulation be felt on only one side?
- When should the pads or lead wires be replaced?
For a broader explanation of TENS, indications, stimulation modes, specifications, and full safety information, read EMPI Select TENS Unit: Programs, Safety, and How It Works.
The complete device and available package can be viewed on the EMPI Select TENS Pain Control Unit product page.
Prescription-device notice: The EMPI Select is labeled for sale by or on the order of a physician or other licensed practitioner. Electrode placement, treatment program, intensity and session schedule should follow the prescribing clinician’s instructions.
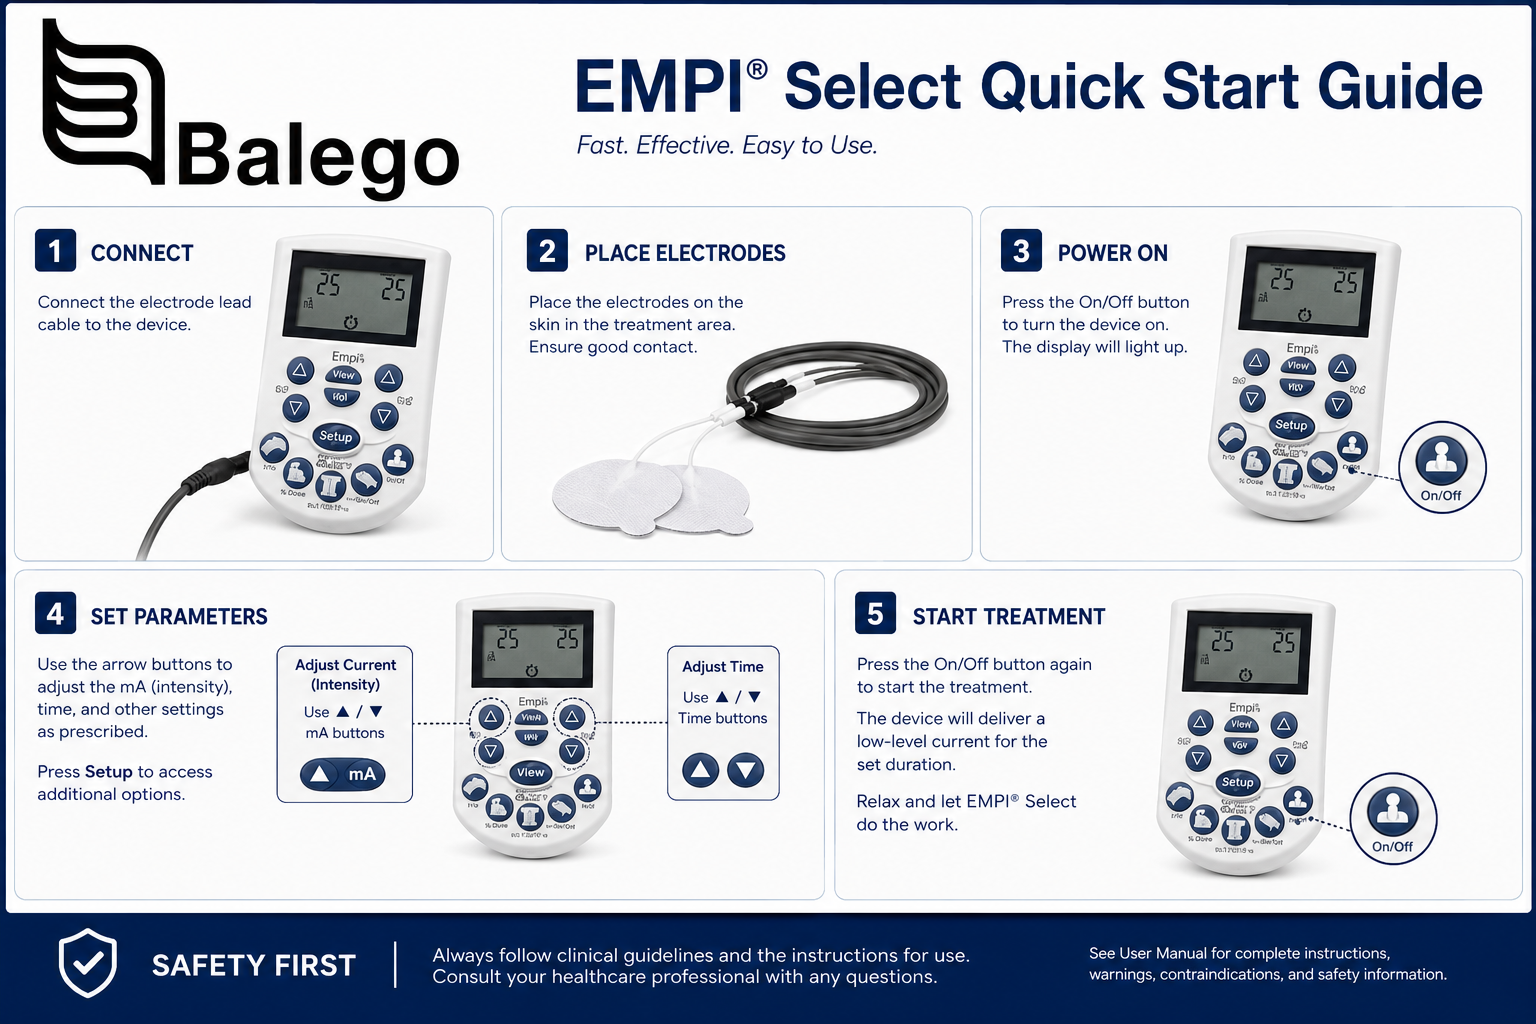
EMPI Select Quick Start at a Glance
| Step | Action | Important detail |
|---|---|---|
| 1 | Confirm the device is off | Do not connect, move or remove electrodes while stimulation is running |
| 2 | Install two AA batteries | Use two batteries of the same type; do not mix alkaline and rechargeable batteries |
| 3 | Connect each lead wire to two electrodes | Each active channel requires a complete electrode pair |
| 4 | Insert the lead wire fully into the EMPI Select | A partially seated device connector can trigger an electrode-contact error |
| 5 | Prepare clean, dry, intact skin | Remove lotion, oil and perspiration |
| 6 | Apply the electrodes | Follow the placement shown by the prescribing clinician |
| 7 | Turn the unit on | Both channel intensities begin at 0.0 |
| 8 | Select the prescribed program | Use a Quick Select body-area button or the Mode button |
| 9 | Increase Channel 1 and Channel 2 separately | Raise each active channel to a strong but comfortable sensory level |
| 10 | End the session before removing pads | Turn the device off, disconnect the leads and gently remove the electrodes |
This sequence follows the user manual and the manufacturer’s quick-reference workflow.
Before the First Session
ensure you have:
- The EMPI Select unit
- Two AA batteries
- One lead wire for each channel being used
- Two electrodes for each active channel
- Electrode storage liners
- The clinician’s placement and program instructions
- Clean, dry and intact skin at the treatment site
Understanding the two-channel system
The EMPI Select has two independently controlled channels.
| Configuration | Lead wires | Electrodes | Common purpose |
|---|---|---|---|
| One-channel treatment | 1 | 2 | A smaller or more localized treatment region |
| Two-channel treatment | 2 | 4 | Broader coverage or two independently adjusted electrode pairs |
Each channel completes a circuit between two electrodes. A channel should not be operated with only one electrode connected.
The intensity shown for Channel 1 does not automatically apply to Channel 2. Each channel must be increased separately.
Step 1: Install the Batteries
The EMPI Select model 199584-001 user manual specifies two AA batteries. Alkaline or compatible NiMH rechargeable AA batteries may be used, but battery types should not be mixed. Turn the unit off and disconnect the lead wires before replacing batteries.
Battery installation
- Turn the EMPI Select off.
- Rotate or move the belt clip as needed to access the battery compartment.
- Remove the battery cover.
- Insert two matching AA batteries according to the positive and negative markings.
- Reinstall the battery cover securely.
- Turn the unit on and confirm the battery indicator.
Battery precautions
- Do not mix alkaline and rechargeable batteries.
- Do not mix old and new batteries.
- Never attempt to recharge alkaline batteries.
- Remove the batteries when storing the unit for two weeks or longer.
- Replace batteries exposed to water or another liquid.
- Replace or recharge the batteries when the low-battery icon flashes.
- Turn the device off before opening the battery compartment.
Step 2: Connect the Electrodes to the Lead Wires
Connect the two electrode pins at the patient end of the lead wire to two compatible self-adhesive electrodes.
Push each pin fully into the electrode’s molded socket. A loose pin connection may cause the following:
- Intermittent stimulation
- Stimulation from only one electrode
- A flashing electrode-contact icon
- The channel intensity decreases automatically
- An unexpectedly sharp or uneven sensation
Do not pull the electrode by its pigtail wire when connecting or removing it.
Step 3: Connect the Lead Wires to the Unit
Confirm that the device remains off. Insert the protected device-side lead-wire connector fully into the appropriate Channel 1 or Channel 2 socket.
The connector should sit completely in the socket. A connection that looks inserted but has not reached full depth can prevent the channel from operating.
Use only a lead wire with the correct EMPI device-side safety connector. A generic lead wire may use the same 2 mm electrode pins while having a different device plug.
For help identifying electrode and lead-wire connections, read TENS and NMES Electrode Connectors: Pigtail vs. Tab.
Step 4: Prepare the Skin
Good skin preparation improves adhesion and can make the stimulation feel more even.
- Wash the area with mild soap and water when necessary.
- Remove oil, lotion, perspiration, and cosmetic products.
- Dry the skin completely.
- Clip excess hair when needed rather than shaving immediately before treatment.
- Inspect the site for cuts, rash, irritation, or reduced sensation.
Do not place electrodes over:
- Broken or irritated skin
- Infected areas
- Areas with substantially reduced sensation
- The front or sides of the throat
- A current path through the chest
- The head or across the temples
- A placement prohibited by the clinician or device manual
The manual advises discontinuing treatment if a persistent rash, inflammation, irritation, or burn develops.
Step 5: Apply the Electrodes
Remove each electrode from its protective liner by lifting the pad—not by pulling the attached pigtail wire.
Place the full gel surface against the skin and press across the entire electrode so that
- All edges are attached
- No corner is folded
- The electrode is not wrinkled
- The gel is not contaminated
- The two electrodes do not touch
The EMPI Select manual states that electrodes should be separated by at least two inches and should not be moved while the device is on.
General placement principles
| Placement objective | Practical principle |
|---|---|
| Localized treatment | Position the electrode pair around the clinician-identified painful region |
| Broader coverage | Use both channels with four electrodes as directed |
| Comfortable stimulation | Avoid placing pads directly over prominent bone when a nearby soft-tissue position is available |
| Reliable contact | Select a pad size and shape that lies flat against the body contour |
| Safe current path | Do not place electrodes so current passes through the head, throat or chest |
| Repeatable setup | Mark or photograph the clinician-approved locations when permitted |
Body-area diagrams are examples rather than universal prescriptions. The diagnosis, location of symptoms, and clinician’s treatment plan should determine the final placement.
Step 6: Turn the EMPI Select on.
Press the On/Off button.
The device briefly displays its startup information and then returns to the last program used. Both channel intensities begin at 0.0, even when the previously selected program is retained.
Starting at zero is an intentional safety feature. It prevents the device from immediately returning to a previous high-intensity setting when a new session begins.
Step 7: Choose the Treatment Program
A program can be selected using:
- One of the five body-area Quick Select buttons, or
- The Mode button for manually selectable program options
The clinician should identify the appropriate program before home use.
EMPI Select Quick Select Program Comparison
| Quick Select button | Program assigned by the manual | Sensation pattern in general terms |
|---|---|---|
| Knee | Alternating Ramped Burst, or ARB | Channels alternate through gradual ramp-up, hold and ramp-down periods |
| Shoulder | Simple Modulated Pulse, or SMP | The pulse pattern changes automatically rather than remaining completely uniform |
| Low Back/Hip | Modulated Amplitude, or MA | Stimulation intensity varies rhythmically within the programmed range |
| Hand/Wrist | Simple Modulated Pulse, or SMP | Uses the same broad modulation family as the shoulder preset |
| Back | Modulated Amplitude, or MA | Varies stimulation amplitude over time |
The five buttons are shortcuts to predefined programs; they are not electrode-placement diagrams and do not determine whether TENS is clinically appropriate for that body region.
Manually Selectable Program Options
The Mode button can also cycle among the following:
| Mode | General operating pattern |
|---|---|
| Continuous | Delivers a consistent pulse pattern at the selected intensity |
| Burst | Delivers pulses in repeating groups |
| SMP | Automatically varies parts of the pulse pattern |
| Modulation | Vary stimulation characteristics to produce a changing sensation |
Detailed waveform parameters and clinician programming belong in the complete manual and on our EMPI Select programs and safety guide, rather than being duplicated on a quick-start page.
Why does the intensity return to zero when the program changes?
When a different program is selected during an active session, the EMPI Select automatically reduces both channels to zero before entering the new program. Each channel must then be increased again.
This prevents a stimulation level that felt comfortable in one pulse pattern from being transferred automatically into a different pattern.
Step 8: Increase the Intensity
Use the Channel 1 and Channel 2 arrow buttons to adjust each active channel.
Increase intensity gradually until the stimulation is
- Clearly felt
- Strong
- Comfortable
- Located beneath and between the intended electrodes
- Free from burning, sharpness or concentrated stinging
A typical TENS treatment is sensory. A forceful or painful muscle contraction should not be pursued unless the prescribing clinician has provided specific instructions.
Channel-adjustment checklist
| What happens | What to do |
|---|---|
| Only Channel 1 is connected | Adjust Channel 1; leave Channel 2 at zero |
| Both channels are connected | Adjust Channel 1 and Channel 2 independently |
| One side feels stronger | Compare placement, electrode size, skin contact and channel intensity |
| Sensation weakens gradually | Confirm pad contact, then make a small intensity adjustment if permitted |
| Sensation becomes sharp or burning | Reduce intensity and inspect the electrodes and skin |
| No sensation is felt | Stop and troubleshoot rather than continuing to raise intensity indefinitely |
How to Unlock the EMPI Select
The keypad automatically locks after approximately 15 seconds without a button press while intensity is above zero. A lock icon appears on the display.
To unlock it:
- Identify the channel you want to adjust.
- Press that channel’s down arrow once.
- The lock clears.
- Increase or decrease the channel as needed.
Pressing the down arrow unlocks the controls; it does not mean that the device has powered off.
Why the unit locks
The lockout feature helps prevent the following:
- Accidental intensity increases
- Unintended program changes
- Buttons being pressed by clothing
- A stored setting changing while the unit is carried on a belt
What the Main Display Icons Mean
| Display item | Meaning | User action |
|---|---|---|
| Channel 1 or Channel 2 | Identifies the channel being displayed or adjusted | Confirm the correct electrode pair |
| Intensity number | Current output setting for that channel | Adjust only as instructed and tolerated |
| Lock icon | Buttons are temporarily locked | Press a channel down arrow |
| Pad-contact icon | The device detects an incomplete channel circuit or poor contact | Check pads, wires and connections |
| Low-battery icon | Battery power is becoming inadequate | Replace or recharge the two AA batteries |
| Custom | A Quick Select program has been modified and saved | Use only when the change was intentional |
| Data | The device is in treatment-history or reset mode | Use Mode to review data or On/Off to exit |
| dur | Timer-duration setting | Use Channel 2 arrows to adjust the timer |
What the Flashing Pad-Contact Icon Means
The EMPI Select displays a pad-contact icon when it detects poor contact or an incomplete circuit on a channel.
Possible causes include the following:
- A lead wire is not fully inserted into the unit
- An electrode pin is loose
- One pad has lifted from the skin
- An electrode is dry, contaminated or worn
- The two electrodes are touching
- A lead wire is damaged
- Only one electrode is connected to the channel
- The electrode placement does not provide reliable contact
The manual states that after several seconds of poor contact, the unit reduces the channel intensity. If contact remains poor for more than approximately 30 seconds, the intensity drops to zero and must be increased again after contact is restored.
Pad-contact troubleshooting sequence
- Turn the intensity down or turn the device off.
- Press the lead-wire connector fully into the unit.
- Confirm both electrode pins are fully inserted.
- Press the entire surface of each pad against the skin.
- Make sure the pads are separated and not touching.
- Replace electrodes that are dry, dirty, curled, or no longer adhesive.
- Test another compatible lead wire if the problem continues.
- Contact Balego or the prescribing clinician if the error remains.
Setting the Treatment Timer
The built-in timer can be set from one to 60 minutes or left off.
- Turn the unit on and select the prescribed program.
- Press Set until itdur appears.
- Use the Channel 2 up or down arrow to select the number of minutes.
- Press Mode to return to the normal treatment screen.
- Increase the prescribed channel intensity.
- The unit turns off automatically when the timed session ends.
The timer should reflect the treatment plan. A maximum timer setting of 60 minutes does not mean that every treatment should last 60 minutes.
How to End a Session
- Press the On/Off button.
- Confirm that stimulation has stopped.
- Disconnect the lead wires from the device by holding the insulated connector.
- Remove the electrodes gently in the direction of hair growth.
- Place the pads back on their storage liner.
- Seal them in their package.
- Clean the skin when needed.
- Store the unit, wires, and pads in the carrying pouch.
Do not remove or reposition electrodes while the unit is delivering stimulation.
Treatment-History and Compliance Data
The EMPI Select stores basic information from completed treatment sessions. This can help a clinician compare the prescribed plan with actual use.
To enter data retrieval mode:
- Turn the device off.
- Hold the Mode button.
- While holding Mode, press On/Off.
- Release the buttons when the data screen appears.
- Press Mode to move through the stored fields.
- Press On/Off to exit.
EMPI Select Data Codes
| Code | Stored information |
|---|---|
| SES | Number of qualifying treatment sessions |
| HrS | Total accumulated treatment hours |
| ASL | Average session length |
| Channel 1 | Average recorded Channel 1 intensity |
| Channel 2 | Average recorded Channel 2 intensity |
A session is counted in the manual’s SES field when intensity reaches at least 3.0. The unit can store up to 255 counted sessions and as many as 999 accumulated hours.
Do not clear treatment data unless directed. Resetting the unit may also return customized programs to their default parameters.
EMPI Select Troubleshooting Table
| Problem | Likely cause | Corrective action |
|---|---|---|
| The display will not turn on | Depleted batteries or poor battery contact | Install two fresh AA batteries and inspect the battery contacts |
| The unit turns on but intensity stays at zero | Normal startup behavior | Increase the prescribed active channel after pads are connected |
| Buttons do not change intensity | Automatic keypad lock | Press the down arrow for the channel being adjusted |
| The pad icon flashes | Incomplete circuit or poor electrode contact | Reseat the lead, press pads firmly and replace worn accessories |
| Stimulation stops unexpectedly | Pad contact was lost or batteries are low | Restore contact, check the battery icon and raise intensity again |
| Stimulation feels weak with fresh batteries | Dry pads, poor placement or damaged lead wire | Replace or reposition pads and test the lead wire |
| Stimulation is uncomfortable | Intensity too high, pads too close, small pads or poor contact | Lower intensity, increase spacing and replace unsuitable pads |
| Stimulation is felt under only one pad | Poor placement, expired electrode or incomplete connection | Turn off the unit, inspect both pads and reconnect the channel |
| Only one channel operates | Worn pad, damaged lead or channel issue | Swap known-good leads one at a time to isolate the component |
| Output is intermittent | Loose or damaged lead wire | Turn off the device, reseat the connector and replace the lead if movement changes output |
| Sensation fades after several minutes | Normal accommodation or weakening contact | Check contact before making a small clinician-permitted adjustment |
| The program feels intermittent | Burst, modulation or ARB may intentionally vary output | Confirm the selected mode before assuming the device has failed |
| Skin becomes red or irritated | Pad sensitivity, dry electrodes, or poor contact | Stop treatment, remove pads and consult the clinician if the reaction persists |
These troubleshooting priorities are based on the troubleshooting tables in the EMPI Select manual.
When to Replace the Electrodes
Replace an electrode when:
- It no longer adheres across its entire surface
- The hydrogel is dry or visibly contaminated
- Corners continue to lift
- Stimulation feels sharp or uneven
- The pigtail connector is loose
- The backing or conductive layer is damaged
- The pad-contact warning repeatedly appears
- The same electrode feels substantially different from the others
- The package instructions indicate replacement
Electrode life is influenced by skin condition, preparation, storage, humidity, body hair, treatment site, and handling. A fixed number of uses should be treated as an estimate—not a guarantee.
For detailed replacement guidance, read EMPI TENS Pads Replacement: Starburst Electrodes.
Replacement Electrode Comparison for EMPI Select
The original EMPI lead wires commonly terminate in standard 2 mm electrode pins. Replacement pads, therefore, need a compatible pigtail-style socket, an appropriate active area, and a shape suited to the treatment site. Confirm compatibility before ordering.
| Balego option | Available profile | Distinguishing feature | Practical fit |
|---|---|---|---|
| Starburst Electrodes | Round, square and rectangular sizes | Silver Starburst current-distribution pattern with thick aloe hydrogel | Premium replacement for users seeking an EMPI-style electrode experience |
| Balego TENS/NMES/FES Electrodes | Multiple compact and general-use sizes | Made in the USA with thick reusable hydrogel and molded pigtail connector | Strong all-purpose value for routine TENS use |
| 696SS Superior Silver Blue-Gel Electrodes | 2 × 2-inch square | Silver/carbon construction with skin-friendly PolyHesive™ blue gel | Useful when a gentler gel interface is preferred |
| KF5050 Bulk Electrodes | Approximately 2 × 2 inches | Bulk packaging with Japanese hydrogel | Clinics or programs maintaining higher replacement inventory |
| Electrotherapy Electrode Collection | Multiple brands, shapes and package quantities | Broad comparison across reusable stimulating electrodes | Buyers who need a less common shape, backing or gel style |
Starburst and Balego reusable electrodes are designed with pigtail-style sockets for compatible, standard 2 mm electrode pins. Always verify both the connector and required electrode size.
Replacement Lead-Wire Guidance
Lead wires may need replacement when:
- Output changes as the wire moves
- The insulation is cracked
- Conductors are exposed
- A pin is bent
- The device connector feels loose
- One channel works only with a different lead
- Pad-contact errors continue with new electrodes
The official EMPI accessory guide identifies touchproof lead-wire models made for the Select platform, including EMPI part number 193057-100. Device-side connector compatibility is important; do not assume a standard 2.35 mm portable-stimulator lead wire will fit the EMPI Select.
EMPI Select Accessories: What Should Be Replaced First?
| Symptom | First item to inspect | Why |
|---|---|---|
| The pad will not stay attached | Electrodes | Hydrogel has likely lost adhesion |
| Sharp feeling under one corner | Electrodes and skin contact | Partial contact concentrates current |
| Output cuts in and out when the cable moves | Lead wire | The internal conductor may be damaged |
| No display | Batteries and battery contacts | This is upstream of the stimulation circuit |
| One channel works with either lead; the other never works | Device channel | The unit may require service |
| The pad icon appears with every electrode set | Lead wire and device socket | The issue may not be the pads |
| Both channels feel weak | Batteries, pads and skin preparation | A system-wide contact or power issue is more likely |
Important Safety Stop Points
Do not begin or continue treatment when:
- The pain has not been medically or clinically evaluated
- The patient has a demand-type cardiac pacemaker or implanted defibrillator
- Electrode placement would send stimulation through the head
- Electrodes would be placed over the carotid sinus region of the throat
- A current path would cross the chest
- The treatment site is infected, broken or lacks normal sensation
- The stimulation remains painful after reducing intensity
- A persistent rash, burn, blister or substantial irritation develops
- The lead wire or electrode is damaged
- New or unexplained symptoms appear
The manual also states that safety during pregnancy has not been established and that the device should be used under the supervision of the prescribing practitioner.
What This Quick-Start Page Should Not Duplicate
To keep Balego’s content useful rather than repetitive, this page should link to—not reproduce—the following information:
| Reader need | Best Balego resource |
|---|---|
| Complete EMPI Select specifications and purchasing information | EMPI Select product page |
| Explanation of how TENS works and full safety summary | EMPI Select Programs, Safety and How It Works |
| Differences among replacement-pad designs | TENS Electrode Guides |
| Premium replacement for discontinued EMPI-style pads | EMPI TENS Pads Replacement: Starburst Electrodes |
| Pigtail, tab and snap connector differences | TENS/NMES Electrode Connectors |
| Comparison with basic and multimodality stimulators | EMPI Select product comparisons |
| All available TENS devices and accessories | Balego TENS Collection |
Frequently Asked Questions
How do I unlock an EMPI Select TENS unit?
Press the down arrow for the channel you want to adjust. The unit automatically locks after approximately 15 seconds without button activity while stimulation is running.
Why does the EMPI Select start at 0.0?
The program can remain stored between sessions, but both channel intensities return to zero at startup as a safety feature.
Why does the intensity return to zero when I select a different program?
A different stimulation pattern may feel stronger or weaker at the same numerical setting. The EMPI Select therefore lowers both channels to zero when a new program is chosen.
How many batteries does the EMPI Select use?
The user manual for EMPI Select model 199584-001 specifies two AA batteries. Balego’s product-page battery specification should be updated to match the model manual.
Can I use only one channel?
Yes, when the prescribing clinician directs a one-channel treatment. Connect one complete lead wire and two electrodes, then adjust only that channel.
Can I use one electrode on a channel?
No. Each active channel requires two connected electrodes to complete the circuit.
Why is the pad icon flashing?
The unit detects an open or poorly connected circuit. Check the lead-wire connection, both electrode pins, pad adhesion, electrode spacing, and the condition of the lead wire.
Why does the unit lower the intensity by itself?
Poor electrode contact can cause the EMPI Select to reduce the channel automatically. If contact remains poor, the output may fall to zero.
Why does stimulation feel weaker after a few minutes?
The nervous system may accommodate a steady sensation. Pad adhesion, perspiration, and battery condition can also affect perceived output. Confirm contact before increasing intensity.
Why is stimulation felt under only one pad?
One electrode may have poor contact, the pads may be poorly positioned, or the lead connection may be incomplete. Turn the unit off and inspect the entire channel.
How far apart should EMPI Select electrodes be?
The user manual specifies at least two inches between electrodes. The prescribing clinician may recommend greater spacing according to the treatment region.
Can the electrodes be moved while the unit is on?
No. Turn the device off before moving, reconnecting, or removing electrodes.
How long should an EMPI Select session last?
Follow the prescribing clinician’s treatment schedule. The device timer can be set between one and 60 minutes, but the timer range should not be interpreted as a universal recommended duration.
How often can the EMPI Select be used?
Frequency depends on the diagnosis, program, placement, skin response, and clinician’s plan. Remove the fixed “three to four times daily” recommendation unless it is clearly identified as a historical example from a specific brochure.
How long do the pads last?
There is no guaranteed number of uses. Replace pads when they no longer adhere completely, feel uneven, cause discomfort, or repeatedly trigger contact errors.
Can replacement Balego electrodes work with EMPI Select?
Many pigtail electrodes accepting standard 2 mm lead-wire pins may work with the original EMPI lead wires. Confirm pad size, connection, and device instructions before purchase.
Can a generic replacement lead wire be used?
Not necessarily. The EMPI safety connector on the device must match. A lead wire may have standard 2 mm electrode pins but the wrong plug for the unit.
What do SES, HRS, and ASL mean?
- SES: counted treatment sessions
- HrS: total accumulated treatment hours
- ASL: average session length
The data screen also stores average intensity information for both channels.
Is EMPI Select an NMES unit?
No. The EMPI Select is a TENS pain-control unit. It is not intended to provide the muscle-contraction programs associated with NMES.
Is the EMPI Select still available?
Yes. The EMPI Select TENS Pain Control Unit is available, along with compatible replacement-electrode options and selected EMPI accessories.
Clinical and User Takeaway
The most reliable EMPI Select setup follows a consistent sequence:
- Turn the unit off.
- Install two AA batteries.
- Connect two electrodes to each active lead wire.
- Insert the lead wires fully into the device.
- Apply the pads to clean, dry, intact skin.
- Turn the unit on.
- Select the prescribed program.
- Increase each channel separately to a strong but comfortable level.
- Press a channel down arrow whenever the controls lock.
- Stop and inspect the setup when the pad-contact icon flashes or stimulation becomes uncomfortable.
Most apparent device failures are caused by batteries, worn electrodes, incomplete lead-wire connections, or poor pad contact. Troubleshooting these components in order can often identify the cause without changing the prescribed treatment settings.
Shop the EMPI Select TENS unit, compare replacement electrotherapy electrodes, or review our TENS electrode and connector guides.


