



Trigger finger—also called stenosing flexor tenosynovitis—causes pain, clicking, catching, or locking when a finger or thumb bends and straightens. The problem usually occurs where a flexor tendon passes through the A1 pulley at the base of the digit.
The tendon or pulley may become thickened, creating a mismatch that prevents the tendon from gliding smoothly. A tender nodule may be felt on the palm side of the hand, and symptoms are often worse after inactivity or first thing in the morning. The ring finger and thumb are affected most often, although any digit can develop triggering.
Iontophoresis may occasionally be considered within a clinician-directed conservative program when:
- The diagnosis has been confirmed.
- Symptoms are mild to moderate.
- The digit can still be actively or passively straightened.
- A prescriber has selected an appropriate ionized medication.
- The skin is intact.
- The clinician wants localized, noninvasive medication delivery.
- Progress will be measured and the treatment stopped if it is not helping.
However, iontophoresis should not be described as a standard first-line treatment or as clinically equivalent to a tendon-sheath corticosteroid injection. Current major trigger-finger resources emphasize activity modification, splinting, gentle exercise, pain medication, corticosteroid injection, and—when necessary—percutaneous or open A1 pulley release. Direct controlled evidence specifically supporting iontophoresis for idiopathic trigger finger is limited.
Clinical scope: This article provides an evaluation and treatment-planning framework. It does not prescribe a medication, concentration, polarity, electrical dose, current, treatment frequency, or number of visits.
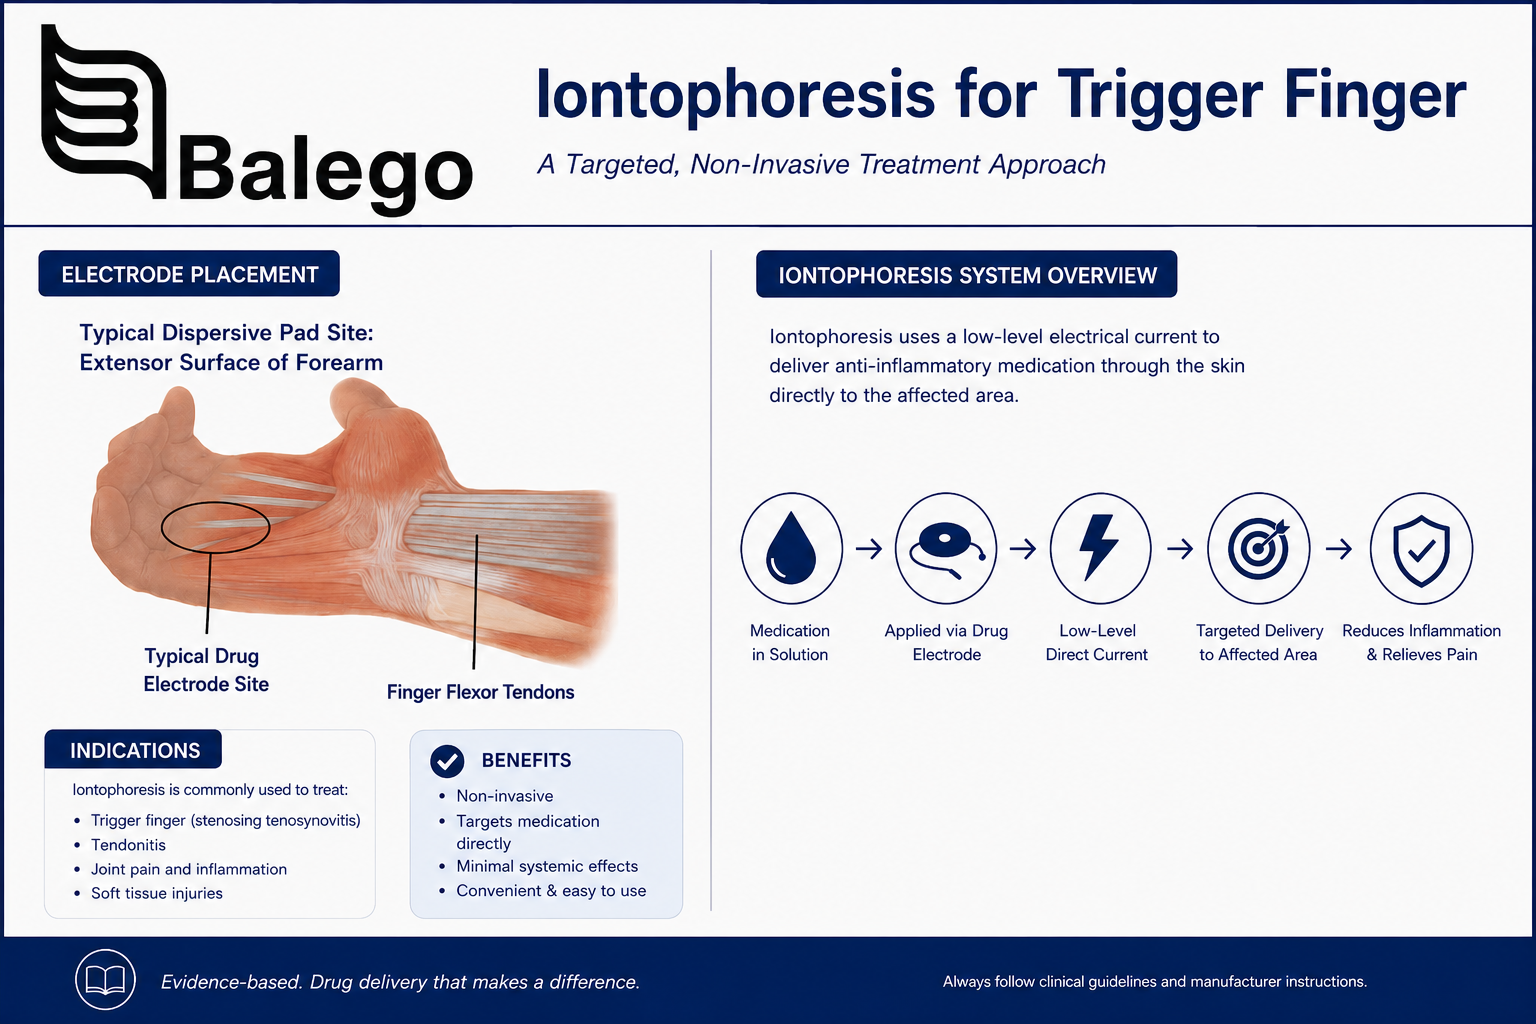
Quick Clinical Summary
| Question | Practical answer |
|---|---|
| What structure is usually involved? | The flexor tendon–A1 pulley interface at the base of the finger or thumb |
| How is trigger finger diagnosed? | Usually by history and physical examination |
| Is imaging routinely required? | No, imaging is generally reserved for an atypical presentation or uncertain diagnosis |
| Where is the drug-delivery electrode positioned? | Over the palpable A1 pulley or tender triggering region on the palm side of the hand |
| Where is the return electrode positioned? | Proximally over intact soft tissue, commonly on the forearm, following the electrode and controller instructions |
| Which medication is used? | Only a prescriber-selected, water-soluble ionized medication |
| Is iontophoresis a proven replacement for injection? | No |
| What should be measured? | Pain, triggering frequency, severity grade, active motion, grip-related function, and skin response |
| When is referral important? | Fixed locking, worsening contracture, suspected infection or injury, neurologic symptoms, or failure of conservative care |
Understanding the A1 Pulley
Each finger flexor tendon travels through a series of fibrous pulleys that keep it close to the bone. The A1 pulley sits in the palm near the metacarpophalangeal joint, where the finger meets the hand.
In trigger finger:
- The flexor tendon may become thickened or develop a nodule.
- The A1 pulley may become thickened or narrowed.
- The enlarged tendon has difficulty moving through the restricted pulley.
- The tendon catches and then releases suddenly.
- Repeated catching can produce pain, stiffness, swelling, or loss of motion.
The target for examination and electrode placement is therefore usually the palmar base of the affected digit, not the middle joint or fingertip.
Common symptoms
- Tenderness at the base of the finger or thumb
- A palpable nodule on the palm side
- Clicking or popping during active movement
- Intermittent catching
- A digit that requires extra force to straighten
- Locking that must be corrected with the opposite hand
- Morning stiffness
- Pain during gripping or pinching
- Reduced confidence using the hand
Pain without mechanical catching may indicate an earlier stage, a different diagnosis, or a coexisting hand condition.
Is Iontophoresis an Evidence-Based Trigger Finger Treatment?
What is established
Current orthopedic and hand-care references recognize the following conservative options:
- Reducing aggravating gripping or pinching
- Rest or activity modification
- Night splinting
- Gentle mobility exercises
- Oral or topical pain medication when medically appropriate
- Corticosteroid injection
- Surgical or percutaneous release for persistent or severe cases
Steroid injection is a commonly established nonsurgical intervention, while release of the A1 pulley may be recommended for persistent symptoms or a digit fixed in flexion.
What is uncertain
Iontophoresis can transport an appropriately charged medication through intact skin by means of low-level direct current. That general drug-delivery mechanism is established.
The limitation is that evidence for the specific clinical outcome of iontophoresis in ordinary trigger finger remains limited. Current reviews of trigger-finger rehabilitation discuss splinting, exercise, corticosteroid procedures, shockwave therapy, ultrasound-guided procedures, and surgery, but iontophoresis has not emerged as a well-established standalone treatment.
Iontophoresis should, therefore, be described as
- A potential adjunct in selected conservative-care plans
- A method of localized medication delivery
- Dependent on the prescribed medication
- Dependent on correct polarity and placement
- Subject to reassessment
- Not proven to mechanically enlarge or release the A1 pulley
- Not a substitute for referral when locking becomes severe
It should not be described as
- An injection-equivalent treatment
- A guaranteed way to avoid surgery
- A cure for stenosing tenosynovitis
- Proven superior to corticosteroid injection
- Capable of releasing a fixed mechanical obstruction
- Appropriate for every painful or clicking finger
Trigger Finger Evaluation Before Iontophoresis
A focused hand evaluation is more useful than a broad upper-extremity screening that measures shoulder, elbow, and forearm strength without a clinical reason.
Subjective history
Document:
| History question | Why it matters |
|---|---|
| Which finger or thumb is involved? | Identifies the tendon and A1 pulley region |
| When did the symptoms begin? | Helps distinguish recent irritation from longstanding mechanical restriction |
| Is there clicking, catching, or fixed locking? | Establishes mechanical severity |
| Can the patient straighten the digit actively? | Helps grade severity |
| Is the opposite hand required to unlock it? | Suggests more advanced triggering |
| Are symptoms worse in the morning? | Common trigger-finger pattern |
| Which activities provoke it? | Identifies repetitive grip, pinch, tool, sports, or occupational load |
| Has there been acute trauma? | Raises concern for tendon or joint injury |
| Are numbness or tingling present? | Suggests possible nerve involvement or another diagnosis |
| Is more than one digit involved? | May affect differential diagnosis and systemic screening |
| Is there diabetes, rheumatoid arthritis, thyroid disease, or amyloidosis? | These conditions are associated with trigger finger |
| What treatment has already been tried? | Prevents repetition of ineffective care |
| What medications and allergies are present? | Essential before medication delivery |
Trigger finger is more common in people with diabetes, rheumatoid arthritis, and certain other systemic conditions. Diabetes can also influence the response to corticosteroid treatment and requires attention to glucose changes after an injection.
Physical examination
Inspection
Record:
- Resting finger position
- Swelling
- Redness
- Skin integrity
- Surgical scars
- Visible deformity
- Whether the digit remains locked
- Whether other digits are involved
Palpation
Palpate gently for:
- Localized tenderness over the A1 pulley
- Thickening at the base of the digit
- A moving flexor-tendon nodule
- Warmth
- Diffuse swelling
- Tenderness at the MCP or interphalangeal joints
Active movement
Ask the patient to open and close the hand slowly.
Observe:
- Smoothness of flexion and extension
- The point in the motion where catching occurs
- Active correction of the trigger
- Compensatory wrist movement
- Avoidance of full grip
- Pain behavior
Repeatedly forcing a severely symptomatic digit through the catch solely to demonstrate the problem may aggravate the area. Use only the repetitions necessary for evaluation.
Passive movement
Assess:
- Whether the digit can be straightened passively
- Passive extension deficit
- Joint stiffness independent of the trigger
- Whether the restriction appears tendon-based or joint-based
Functional testing
Choose tasks relevant to the patient rather than performing every possible hand test:
- Light cylindrical grip
- Key pinch
- Tip pinch
- Pen or utensil use
- Buttoning
- Tool handling
- Work-specific grasp
- Patient-Specific Functional Scale activity
Grip-strength testing may be useful, but it should not provoke repeated painful triggering.
Trigger Finger Severity Grading
A severity scale makes reassessment more objective.
| Grade | Clinical presentation | Implication |
|---|---|---|
| 0 | Normal movement | No active triggering |
| 1 | Pain or uneven movement without locking | Early or mild presentation |
| 2 | Catching or locking that the patient can actively correct | Mild-to-moderate mechanical involvement |
| 3 | Locking that requires the opposite hand or passive assistance | More advanced mechanical restriction |
| 4 | Fixed deformity that cannot be corrected | Prompt specialist evaluation is indicated |
The Quinnell system and its modifications are commonly used to classify trigger-finger severity.
Iontophoresis is more defensible as an adjunct in a mild, actively correctable presentation than in a fixed grade 4 digit. A fixed contracture is a mechanical problem that should not be managed by indefinitely repeating topical drug-delivery treatments.
Differential Diagnosis: Is It Really Trigger Finger?
Not every painful, stiff, or clicking digit is stenosing tenosynovitis.
| Possible alternative | Findings that may distinguish it |
|---|---|
| Flexor tendon injury | History of trauma, weakness, or inability to flex a joint |
| Dupuytren contracture | Palmar cord or progressive fixed flexion rather than tendon triggering |
| MCP or interphalangeal arthritis | Joint-line pain, swelling, stiffness, or deformity |
| Sagittal-band injury | Extensor tendon instability at the knuckle |
| Tendon-sheath infection | Marked swelling, warmth, severe pain, systemic symptoms, or pain with passive extension |
| Fracture or ligament injury | Acute trauma, bruising, deformity, or focal bony pain |
| Carpal tunnel syndrome | Numbness or tingling in the median-nerve distribution rather than isolated mechanical catching |
| Diabetic cheiroarthropathy | Broader hand stiffness and limited joint mobility |
| Postoperative adhesions or scarring | Prior surgery and restricted tendon excursion |
| Congenital trigger thumb | Pediatric presentation requiring a different clinical pathway |
Trigger finger is generally diagnosed clinically, and routine imaging is usually unnecessary. Ultrasound or radiographs may be appropriate when the presentation is atypical, trauma is suspected, or another structure must be evaluated.
When Iontophoresis May Fit
A clinician may consider iontophoresis when all of the following are true:
- Trigger finger has been reasonably confirmed.
- Symptoms are not fixed or rapidly worsening.
- The primary tenderness is localized near the A1 pulley.
- The prescriber has ordered a medication suitable for iontophoresis.
- Medication polarity is verified.
- The patient has no medication sensitivity.
- The treatment area has intact skin.
- The patient is suitable for direct-current treatment.
- The chosen patch or electrode can fit the anatomy without excessive compression.
- Outcomes will be measured.
- A referral plan is already established if the mechanical symptoms persist.
Situations requiring caution or another pathway
| Finding | Recommended response |
|---|---|
| The digit is fixed in a bent position | Refer for medical or hand-surgery evaluation |
| Rapidly increasing redness, warmth, or swelling | Rule out infection or acute inflammatory processes. |
| Recent trauma | Evaluate for fracture, tendon injury, or ligament injury |
| New numbness or weakness | Assess neurological involvement |
| Open wound or damaged skin | Do not place an iontophoresis electrode over the area |
| Medication allergy or unknown polarity | Do not proceed until clarified |
| Sensitive implanted electronic device | Follow the product contraindications and obtain appropriate clearance |
| Marked skin sensitivity | Select another approach or modify the clinician-directed plan |
| No meaningful response to a defined trial | Stop repeating the same treatment and reassess |
| Longstanding or progressively worsening locking | Refer for an established trigger-finger treatment discussion |
Trigger Finger Iontophoresis Protocol Framework
This protocol intentionally avoids repeating Balego’s full electrode instructions, medication-polarity education, and device manuals.
Use the dedicated Iontophoresis Electrode Directions for Use for general preparation, filling, wiring, polarity, dose limits, and safety procedures.
Step 1: Confirm the clinical order
Before opening a patch or electrode kit, verify:
- Exact medication and chemical formulation
- Concentration
- Prescribed volume
- Ionic charge
- Required polarity
- Electrical dose
- Maximum current when a controller is used
- Treatment frequency
- Intended number of sessions
- Treatment location
- Relevant allergies and precautions
Medication is not included with iontophoresis patches or electrode kits. The prescribing professional is responsible for medication selection, dose, and polarity.
Step 2: Identify the A1 pulley target
Locate:
- The base of the involved finger or thumb on the palm side
- The most tender point near the MCP crease
- Any palpable flexor-tendon nodule
- The site where catching can be felt during gentle motion
Mark the target before preparing the skin.
The drug reservoir should be centered over the selected A1 pulley region—not placed randomly over the finger shaft.
Step 3: Choose an electrode format that fits the hand
The base of a finger is a small, curved, mobile treatment area. Product fit can be as important as dose.
Consider:
- Active-electrode footprint
- Reservoir volume
- Ability to conform around the MCP region
- Whether movement will lift an edge
- Whether a wearable patch will interfere with grasp
- Whether the patient can protect the patch during activity
- The amount of soft tissue available for the return electrode
Step 4: Prepare the skin
Follow the exact electrode or patch instructions.
General principles include:
- Use intact skin.
- Remove jewelry.
- Remove lotion, oils, and contamination.
- Allow the skin to dry completely.
- Avoid recent razor irritation, cuts, fissures, and hangnails.
- Inspect both the drug and return sites.
The hand is frequently washed and exposed to cleaning products, so examine closely for small cracks that may not be obvious to the patient.
Step 5: Position the drug-delivery electrode
Place the active medication chamber or electrode.
- Over the palmar A1 pulley region
- Centered on the localized tenderness or palpable nodule
- With the entire conductive surface in contact
- Without placing excessive pressure around the finger
- Without allowing medication to leak onto the adhesive
- Without covering damaged skin
Do not wrap a drug electrode tightly around a digit. Circumferential compression can impair circulation and does not improve iontophoresis.
Step 6: Position the return electrode
Place the return or dispersive electrode:
- Proximally over intact soft tissue
- Commonly on the forearm
- Away from a bony prominence
- Where the full surface can maintain contact
- According to the controller and electrode instructions
A larger return electrode may help distribute current density and improve comfort in a controller-based treatment.
Step 7: Deliver the prescribed dose
Controller-based treatment
With a professional controller:
- Connect the medication electrode to the correct polarity.
- Connect the return electrode to the opposite lead.
- Select the prescribed dose.
- Begin at a tolerable current within the electrode and controller limits.
- Allow automatic ramp-up when available.
- Monitor the skin and patient response.
- Stop for burning, sharp pain, or an electrode fault.
The ActivaDose II Dose Controller allows clinicians to select the current dose while displaying treatment information and safety alerts.
Wearable patch treatment
With a self-contained patch:
- Confirm the correct drug chamber.
- Fill only to the specified volume.
- Prepare the return chamber when required.
- Apply the patch securely.
- Record the application and planned removal time.
- Provide the patient written removal and reaction instructions.
- Do not extend wear simply because symptoms remain.
Compare current IontoPATCH models and ACTIVApatch models before choosing a wearable workflow. Their dose capacities, activation steps, and expected wear times differ.
Step 8: Inspect the skin
After treatment:
- Remove the electrode or patch according to its instructions.
- Inspect both sites.
- Record redness, irritation, blistering, pain, or adhesive reaction.
- Document the location of any response.
- Discard all single-use components.
- Do not reapply another treatment over irritated skin.
Temporary redness can occur with direct-current treatment, but persistent pain, blistering, or significant irritation is not an acceptable treatment endpoint.
Step 9: Reassess function—not just tenderness
A reduction in tenderness without improvement in triggering may not represent meaningful progress.
Measure:
- Triggering frequency
- Severity grade
- Ability to actively extend the digit
- Number of triggering episodes during a standardized motion task
- Morning locking
- Pain
- Functional grip or pinch activity
- Patient-Specific Functional Scale score
- Need to use the other hand to unlock the digit
Electrode Placement Diagram Description
A useful, searchable illustration should show the following:
- The hand palm-up
- The affected finger identified
- The A1 pulley at the palmar MCP crease
- The medication electrode centered over the A1 pulley
- The return electrode on the proximal forearm over soft tissue
- The current path labeled conceptually
- A warning not to wrap tightly around the finger
- A note that polarity depends on the prescribed medication
Choosing an Iontophoresis System for Trigger Finger
The best format depends on anatomical fit, prescribed dose, clinic workflow, skin tolerance, and whether direct control over current is required.
| Balego option | Treatment format | Potential advantage at the hand | Important limitation |
|---|---|---|---|
| ActivaDose II Controller with a small electrode | Wired, clinician-controlled | Direct control of dose and current: treatment can be monitored in the clinic | Requires external lead wires and compatible electrode kits |
| Trivarion Delivery Kits | Flexible controller-based electrode | Form-fitting shapes may help on curved or uneven anatomy such as a knuckle or finger base | Requires a compatible controller |
| Ionto4 Electrode Kits | Controller-based electrode in several shapes and volumes | Small square and butterfly options allow site-specific selection | A footprint must still fit without limiting hand position |
| Balego Buffered Iontophoresis Electrode Kits | Controller-based drug and return electrodes | Several sizes and a buffered return-electrode design | Requires an external iontophoresis device |
| IontoPATCH | Self-contained wearable patch | No external controller or lead wires; several dose and wear-time choices | A patch footprint may be less convenient around a small, highly mobile finger base |
| ACTIVApatch | Self-contained wearable patch | Multiple treatment windows and no external controller | Fit, motion, and adhesive placement must be evaluated carefully |
Trivarion is specifically positioned for curved or uneven treatment areas, while Ionto4 provides small, medium, large, and butterfly electrode choices.
Controller-based treatment may be preferable when:
- The treatment area is very small.
- Precise current adjustment is important.
- The clinician wants to observe the full treatment.
- A small or form-fitting electrode is needed.
- The patient has not used iontophoresis previously.
- Skin response must be monitored closely.
A wearable patch may be preferable when:
- A clinician has already established medication and placement.
- The patch fits the palmar anatomy securely.
- The patient needs to leave the clinic during treatment.
- Longer, lower-current delivery is preferred.
- The patient can follow written wear and removal instructions.
Neither format is universally superior.
Iontophoresis Compared with Other Trigger Finger Treatments
| Treatment option | Primary role | Evidence position | Main advantage | Main limitation |
|---|---|---|---|---|
| Activity modification | Reduces repetitive tendon loading | Common first-line measure | Low risk and easy to begin | May be insufficient when locking is established |
| Night splinting | Limits tendon excursion through the A1 pulley | Common conservative option | Noninvasive and useful for mild symptoms | Adherence and fit can be difficult |
| Gentle mobility | Maintains motion without repeated forceful triggering | Common adjunct | Helps limit stiffness | Aggressive exercise may irritate symptoms |
| Oral or topical pain medication | Symptom management | Commonly recommended when appropriate | Accessible | Does not mechanically release the pulley |
| Iontophoresis | Local medication-delivery adjunct | Trigger-finger-specific evidence is limited | Avoids needle puncture and can localize delivery | Does not mechanically enlarge a narrowed A1 pulley |
| Corticosteroid injection | Established nonsurgical treatment | Commonly supported and recommended | May reduce swelling and resolve triggering | Needle procedure: response varies and recurrence can occur |
| Shockwave therapy | Noninvasive conservative option | Emerging and less established than injection | No injection or incision | Protocols and access vary |
| Percutaneous release | Mechanically releases the A1 pulley | Used for persistent cases | Small procedural approach | Procedural risks and expertise required |
| Open release | Direct surgical release | Established for severe or persistent cases | Definitively addresses pulley restriction | Surgery and recovery are required |
Current orthopedic guidance identifies corticosteroid injection as a common first-line procedure and surgery as an option when symptoms are severe, persistent, or the digit remains stuck.
Iontophoresis may avoid a needle puncture, but that does not make it risk-free or clinically equivalent. It can cause skin irritation or burns, depends on medication transport through the skin, and cannot physically release a fixed A1 pulley.
Adjunctive Rehabilitation
Iontophoresis should not be the only treatment.
Activity modification
Temporarily reduce:
- Repetitive forceful gripping
- Repeated pinching
- Vibrating tools
- Sustained tool handles
- Activities that repeatedly reproduce locking
- High-volume gripping exercise
Modify handles or add padding when appropriate.
Splinting
A clinician may use an orthosis that limits MCP movement or prevents the digit from repeatedly entering the triggering range.
Splint selection depends on:
- Which digit is involved
- Whether symptoms occur at night
- Occupational demands
- Degree of locking
- Skin tolerance
- Ability to perform necessary activities
Splinting is a recognized conservative option, particularly in milder presentations.
Gentle movement
The goal is to preserve motion without repeatedly forcing the tendon nodule through the pulley.
Potential clinician-directed activities include:
- Gentle active flexion and extension in a nontriggering range
- Tendon-gliding modifications
- Passive extension within comfort
- Joint mobility for secondary stiffness
Avoid aggressive gripping, resistance putty, or high-load finger flexion during an irritable stage unless specifically directed.
Ergonomic changes
Consider:
- Larger tool handles
- Reduced pinch force
- Two-handed lifting
- Alternating tasks
- Scheduled rest breaks
- Padded gloves when appropriate
- Reduced exposure to vibration
Reassessment and Treatment Stopping Rules
A treatment trial should have a defined endpoint.
Baseline and follow-up measures
| Measure | Baseline documentation | Meaningful improvement |
|---|---|---|
| Pain | 0–10 rating at rest and with grip | Lower pain during the same task |
| Trigger grade | Quinnell or modified grade | Movement to a lower grade |
| Trigger frequency | Episodes per day or during 10 controlled fits | Fewer episodes |
| Active extension | Degrees from full extension | Smaller extension deficit |
| Passive extension | Degrees from full extension | Less fixed stiffness |
| Morning locking | Duration and assistance required | Less frequent or easier correction |
| Functional task | PSFS, QuickDASH, work task, utensil use, buttoning | Improved score or task tolerance |
| Skin response | Redness, irritation, pain | No worsening reaction |
Continue only when:
- The skin remains suitable.
- Medication delivery remains medically appropriate.
- Triggering or function is improving.
- The treatment does not delay a needed referral.
- The broader rehabilitation plan is progressing.
Stop and reassess when:
- Symptoms worsen.
- The finger becomes more difficult to unlock.
- Skin irritation accumulates.
- No measurable improvement occurs during the planned trial.
- A medication reaction is suspected.
- The diagnosis becomes uncertain.
- The patient develops numbness, marked swelling, or new weakness.
- Treatment adherence is poor because the patch or electrode does not fit.
Repeating the same modality without an objective response is not a treatment plan.
Documentation Template
Diagnosis and baseline
- Affected digit:
- Dominant hand:
- Symptom duration:
- Quinnell grade:
- Palpable A1 pulley tenderness:
- Palpable nodule:
- Active locking:
- Passive correction required:
- Pain at rest:
- Pain with grip:
- Trigger episodes during standardized movement:
- Relevant medical history:
- Prior treatment:
Iontophoresis treatment
- Medication and formulation:
- Prescriber:
- Concentration:
- Volume:
- Polarity:
- Device or patch:
- Drug-electrode size and location:
- Return-electrode size and location:
- Electrical dose:
- Current:
- Treatment time or patch wear time:
- Skin condition before treatment:
- Patient response during treatment:
- Skin condition after treatment:
Adjunctive care
- Splint:
- Activity modification:
- Home movement program:
- Ergonomic changes:
- Patient education:
- Referral or follow-up plan:
Outcome
- Change in pain:
- Change in grade:
- Change in triggering frequency:
- Change in active extension:
- Change in functional task:
- Continue, modify, discontinue, or refer:
Frequently Asked Questions
Can iontophoresis cure trigger finger?
It should not be presented as a cure. Iontophoresis may deliver a prescribed medication to a localized superficial region, but trigger finger includes a mechanical mismatch between the flexor tendon and the A1 pulley.
Is iontophoresis a replacement for a steroid injection?
No. Steroid injection is an established trigger-finger procedure. Direct evidence showing that iontophoresis produces equivalent results is lacking.
Which medication is used?
Only a prescriber-selected medication that is appropriate for iontophoresis. The exact formulation, concentration, polarity, volume, and dose must be verified before treatment.
Where is the medication electrode placed?
It is generally centered over the A1 pulley or the most localized tender triggering region at the palm-side base of the affected digit.
Where should the return electrode go?
It is generally positioned proximally on intact soft tissue, commonly the forearm, according to the electrode and device instructions.
Can the electrode be wrapped around the finger?
It should not be wrapped tightly or placed circumferentially in a way that compresses the digit. The full electrode surface must maintain safe contact without restricting circulation.
Is a small electrode always better?
No. It must be small enough to fit the target but large enough to distribute current safely and hold the prescribed solution. Follow the electrode’s active-area, fill-volume, current, and dose limits.
Can an IontoPatch be used at the finger base?
Possibly, when the patch fits securely and the clinician confirms the medication chamber can remain centered over the target. A controller with a small or flexible electrode may provide a better fit for some hands.
How many treatments are required?
There is no universally validated iontophoresis course for trigger finger. The prescriber and treating clinician should define the frequency, number of sessions, and reassessment point.
Should the finger be exercised immediately afterward?
Only according to the clinician-directed plan. Gentle motion may be appropriate, but repeated forceful triggering or heavy gripping should not be used as a test of whether the treatment worked.
When should a hand specialist be consulted?
Referral is particularly important when the digit is fixed, symptoms are severe, function is declining, the diagnosis is uncertain, trauma or infection is suspected, or conservative treatment is not producing measurable progress.
Can the trigger thumb use the same protocol?
The same general evaluation principles apply, but thumb anatomy, electrode fit, function, and procedural considerations differ. The clinician should adapt placement and referral decisions to the thumb.
Related Resources
- Shop iontophoresis patches, electrodes and dose controllers
- Iontophoresis Treatment Protocol Library
- Iontophoresis FAQ, Dose and Polarity Guides
- Iontophoresis Electrode Directions for Use
- IontoPATCH Wearable Iontophoresis Patches
- ACTIVApatch Wearable Iontophoresis Patches
- ActivaDose II Iontophoresis Controller
- Trivarion Form-Fitting Iontophoresis Electrodes
- Ionto4 Iontophoresis Electrode Kits
- Buffered Iontophoresis Electrode Kits
This protocol is intended for professional education. Iontophoresis medication delivery should be performed only under appropriate medical direction and according to the medication labeling, device instructions, electrode instructions, facility procedures, and applicable scope-of-practice requirements.


